Friday, March 7, 2008

Ultimate Blog Party!

ImageChef.com - Custom comment codes for MySpace, Hi5, Friendster and more

It's Friday and it's time for the Ultimate Blog Party to begin! I'll start the introductions...

My name is Andrea. I live in Peoria, AZ with my 2 sons and wonderful husband.

My parents live right down the street from me - literally - they are 5 houses down! It actually works out well. They do their thing, and we do ours. We're lucky to see them once a month! My grandmother lives there also! My boys love to spend time with their Great Grandma, Grandma and Grandpa too!

My favorite color is blue! I love all shades of blue - but especially midnight blue.

I am a Stampin' Up! demonstrator. I was just promoted to a Senior Associate! My husband wasn't as excited as I was. Especially since you get the promotion for reaching $1,000 in sales. More than 1/2 was purchased by me - but that's besides the point! Hee hee.

OK! Your turn. Leave me a comment with something I can learn about you! Have a question for me? Ask away!

Don't forget to check out the Ultimate Blog Party site! You can get to it by clicking the big pink box on the right side. There are some great prizes to be won! Check out the prize list. I would love to win #64, #1, #28, #30, #52, and so many more!

Tuesday, March 4, 2008

Peas and Carrots

So it's more carrotts than peas, but you get the idea!


I made these thank you carrots for my hostess group. I had to switch our Hostess club night this month at the last minute due to an awards ceremony for the kids basketball teams. So, it was only right that I minded my "Peas and Carrot ts" and showed them how much I appreciate them!

I used 12" disposable decorating bags. Added some jelly beans. Gave the bag a twist. Stuffed some green tissue paper in the top. Then tied it all together with a little ribbon and a tag. I created the tag using my small tag punch. The thank you stamp came from my Family Phrases set.

Love you a latte!

These On the Go packs of instant coffee were being given out for free at my work the other day. The first thing I thought of was the Scratch & Sniff technique! So, of course I grabbed one! Wonder if they have any more?! I used my Pun Fun stamp set for this cute card. I stamped my image on a 2-1/2" x 2-1/2" piece of Whisper White card stock using my classic ink. I then used my Versamarker to fill in the cup where the coffee would go. It did smear my ink - but that was OK because it made my coffee black. I then sprinkled my mixture of coffee crystals and clear embossing powder over the wet Versamarker, and gave it a quick blast of heat with my heat gun. To color the cup, I used my Rich Regal Watercolor Crayons.

The paper is Rose Red Designer Series paper. Added a touch of Whisper White ribbon to finish the card off. The base of the card is Whisper White card stock - cut to 3" x 6" - to give me a cute gift note sized card. Perfect to add to a Mother's Day gift bag.

And yes, it does really smell like coffee!
Congrats to Melanie Muenchinger over at Hands, Head and Heart. She made her goal of reaching the Top 100 stamp sites! It is one of my favorite blogs to check out daily. Go check out why...

http://melaniemuenchinger.blogspot.com/2008/03/top-100.html

Isn't that tote bag adorable?

Monday, March 3, 2008

Lucky Charms


I made these 4 leaf clovers with my scallop punch! Rather simple actually. Just start at a peak and cut out one slice every 2 scallops - excep after the fourth one. You will have a single scallop that just needs the tip cut off to create the stem.

Didn't have time to add any glitter - but bling clovers would rock!

5 Minutes for Mom

You've got to check out this website! There are great resources for Moms, Giveaways, and Faith Lifts!

While you are there - enter to win a great SAK purse!
http://www.5minutesformom.com/3023/sak-dakota-hobo/

Sunday, March 2, 2008

So much to share with you...

I started preparing my display boards for our P.M.S. party! Here are just a few of the sample items I will have to show. If you have any questions... leave me a comment!

Joseph's Coat technique with a top layer of Crystal Effects and Dazzling Diamonds.

Remember when you would color a piece of paper with different colors and then color over the top with a black crayon and scratch the black with a design? Well, now they have the paper that's already made that way for kids, but here is a stamper's version. It's done using a brayer, glossy card stock, Versamark, Classic Inks, embossing powder, and a heat gun.

You're A Blast - from Pun Fun is such a cute stamp set! To create the corners on the Gable Green card stock, and Real Red card stock, I used my Slit Punch. The ribbon was made using Whisper White Grosgrain, and my Gable Green marker!

Thank Ewe, thank ewe very much! I used my markers to omit the heart that this cute sheep was holding in it's left hand. Or is that a hoof? The colors are Old Olive and So Saffron.
Going Baroque. I love this set! This is a 6x6 layout. I used my Scallop punch, my 1-3/8" circle punch and my 1" circle punch to create the medallion.
Friendship Blooms. I almost didn't get this Sale-A-Bration set - but I am glad I did! This card was CASED from Nancy Riley. I used So Saffron, Basic Black, and Whisper White here.
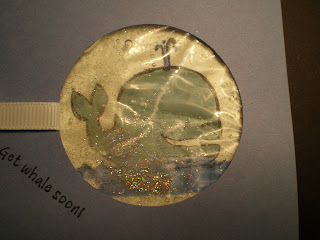
Get Whale Soon! This whale is part of the Pun Fun set. He is so much fun! I used my Round Tab punch to create a circe large enough for the whale to peek through. What's he swimming in? Why that would be clear hair gel! I did add a little glitter for some sparkle.

Here's a closer view of the whale.


My boys have their last basketball game next Saturday. To thank my youngest sons coach, I made this card using All in the Family and it's accessory set. Cute huh?!

Till next time...

Saturday, March 1, 2008

The Occasions Mini is here!

The Occasions Mini Collection is here! Be sure to check out the great new items that are available until May 31! Don't forget all the stamp sets in this Mini are die-cut!http://www.stampinup.com/us/documents/occasionsmini08_US.pdf

Friday, February 29, 2008

Craft Buddy!

This is my craft buddy - Suz - and me at a scrapbooking fest last weekend. We had fun working on our never ending scrapbooks. We also made these cute bracelets using patterned paper and beads. I also learned how to spend a bunch of $2 bills! Seriously, who uses these? TTFN!

Suz is the ultimate crafter! Go check out her crafts at http://www.craftsbysooze.blogspot.com/. She and her husband are Waiting for Caroline to come from China. She uses her talents as a crafter to feed their adoption fund. Check out http://www.waitingforcaroline.blogspot.com/ for more of her cute crafts!

Wednesday, February 27, 2008

Friendship Blooms

I've had these tins in my basket for a while and decided I needed to use one! I still have 6 left! I used the Sale-A-Bration set called Friendship Blooms for this image.

I started with the flower image. I stamped it using Basic Black on Whisper White Cardstock. I then stamped the same image on a Post-it Note. I cut the image on the Post-it out and covered the image on my Whisper White. I then used the swirl image and went right over the flower image to get the swirls as close to the flower as possible. Neat huh?! This technique is called masking - because you create a mask with the Post-it.

To color the image I used my Aqua Painter and my Rich Regals Watercolor Wonder Crayons. These Crayons are so awesome. I highly recommend them! I started with the Rose Red on the large petals. After I had painted the color on the petals, I went back with the Crayon and colored in the center of the petals and the center of the flower. I then used my Handsome Hunter Crayon on the swirls.

More bling was in order here. I used my 2-way glue pen in the center of the flower, and sparingly on the black part of the flower. Then sprinkled some Dazzling Diamonds Glitter on.

If you have Watercolor Wonder Crayons sitting on your shelf - go get them. You won't be disappointed!

Ouch!

I received this image from a crop that I attended on Sunday. It is from a new set in the Spring-Summer 2008 Catalog called Pinch Proof. I thought it needed a little bling. So I used my Versamark pad over the top of my image, and sprinkled Iridescent Ice over the top. Then I gave it a quick blast from my heat gun. That's where the ouch came from! Seems no matter how many times I heat emboss something - I always burn myself. Duh! It's hot! Guess I need a little more luck.

So Sweet of You


That's the cute sentiment on this stamp from the So Many Scallops set that you can earn for FREE from the Sale-A-Bration catalog.
I used Purely Pomegranite for my base here. I stamped the image in Versamark and randomly stamped it on my base. I used a strip of Taken With Teal and layered it with a piece of Whisper White Taffeta ribbon.
I stamped my image again in Whisper White Craft ink onto my Taken With Teal cardstock. I then painted my flower with my Stampin' Pastels while the ink was wet. Punched out the image with my Scallop punch. Then added a little knot to the center of my main image.
Not quite what I had pictured in my head - but then it doesn't happen very often that something turns up on paper like I had dreamed. I'll give it another shot soon.

Tuesday, February 26, 2008

A Deal Worth Repeating!


Even if you have no interest in being an active demo, this deal is too good to pass up!


Join between now and March 15 and get the starter kit and so much more for only $159!

During Sale-A-Bration, anyone who joins can choose ANY stamp set--a value of up to $47.95--from the Spring-Summer 2008 Collection!

This kit is a fabulous purchase for anyone interested in adding to their stamp supplies!

You will receive 30% off your first order over $150.

And 20% off all future purchases!

Monthly magazines full of great project ideas.

The first look at all new catalogs and stamps.

Bulk buy options.

Access to demo only resources included great ideas and templates.

And of course...
Me! To help you with whatever you decide to do with your kit!
Whether you just want a bunch of supplies to use, or you want to grow your own business,
I will be here to support you!

Still not sure? Contact me today for more information!

Monday, February 25, 2008

Feeling a bit "punchy"

So after blog surfing today, I was feeling a bit punchy. I saw so many cute things made with Stampin' Up! punches that I wanted to try a few of my own.


Thanks Easter Bunny!

The bunny was created using my 1-3/8" circle punch, my 1/4" circle punch, and my large oval punch. The pink was added to his ears and cheeks using some Stampin' pastels. I drew the mouth and whiskers using my Basic Black Journaling Marker. A couple google eyes finish his face.


It's the luck of the Irish!


What a cutie huh? I used my scallop circle punch for his hair, my 1-3/8" circle punch and 1/4" circle punch for his face and nose. His hat was created using my round tab punch, and my small tag punch. I trimed the end of the tag down so it wasn't quite so tall. I added a little strip of black cardstock and with a Stampin' Pastel yellow buckle. His cheeks were created by dipping the tip of a pencil eraser into my Stampin' Pastels.

So the faces aren't the best. Wouldn't it be great if Stampin' Up! created a set of faces that could be used with our punches?!

What can you create with your punches?

Monday, February 18, 2008

Photo Coaster

This is a picture of my oldest son taking a jump on his quad. You're probably wondering how much I paid to have it put onto this coaster, right? Well let me tell you - it was less than $1 - and I did it myself. You can do it too!

Using a digital photo studio you need to change your picture to black and white. Adhere plain white tissue paper (the kind you stuff gift bags with) and secure it to a piece of regular printer paper using tape. Then print it! Simple enough.

Separate the tissue paper from the printer paper. Trim your tissue photo to fit the way you want onto your 4x4 unglazed tumbled tile. Then brush a light coat of Mod Podge directly onto the tile. Place the tissue photo onto the tile, starting with the middle. Remember - you are using thin tissue so be gentle as it will tear easily. Smooth the tissue to lay as flat as possible.

Then brush another coat of Mod Podge over the top of the tissue photo and allow to dry. Again - remember to be gentle!

The Mod Podge will give it a little protection, but if you plan on heavy use of these tiles, I recommend sealing it once more with a coat or two of polyacrilic clear spray.

From start to finish - about 30 minutes!

Let me know if you give these awesome gifts a try!

Scratch n' sniff!

Can you smell it? Mmm... I sure can! It smells like a strawberry! Really! I used the scratch n' sniff technique on this strawberry.

You can purchase this strawberry in the Tart & Tangy set that will be available on March 1.

First, I stamped the image in Real Red Craft Ink, on Whisper White cardstock. Then to make it scratch n' sniff, I mixed unsweetened strawberry kool-aid and clear embossing powder. The mix ratio was about 1:1. I then stamped the strawberry using Versamark onto Glorious Green cardstock, and trimmed the top off. I adhered it on the red part using Snail adhesive. I then cut out the whole strawberry, and attached it to a Whisper White scallop using 2 Dimensional dots.

Using my 1/16" handheld punch I went around the outside of the scallop. Then used Snail adhesive to attach the White scallop to a Real Red scallop. The back is identical to the front, minus the strawberry.

I didn't have any Real Red ribbon - so I made it! Using Whisper White ribbon and a Real Red marker! Too fun!

We will be making one of these yummy treats at our Hostess club on March 10th!

Sunday, February 10, 2008

Jumbo!

I made this Jumbo Paperclip/Bookmark in a matter of minutes (despite the fact that I've had these Jumbo clips for over a month)! I used my scallop punch and Whisper White cardstock to punch 2 scallops for the base. Then I used my 1-3/8" punch on Real Red cardstock for the center circle. I added a Rub-on from the Eastern Elegance collection and a black brad. I used a little Crystal Effects to secure the clip to one of the scalloped circles and then placed the layered scallop on top. I added a little gingham ribbon to finish it off. Done!

You can find these Jumbo clips in the office supply section of your store.

Sunday, February 3, 2008

Sweet Dahlia


I saw a few of these beautiful flowers on SCS, and thought I would give them a try. They are actually quite easy!

Would you believe that it only takes 8 circles to create this beautiful flower? Just 8!

I'd try to explain the directions, but am afraid I would lose you! So check out the directions here - there's even a diagram to follow! http://www.cardsandcrafts.freeservers.com/dahlia.html If you still need help, let me know!

Materials used:

  • 1-3/8" Circle punch
  • Build A Brad with 1/4" punch
  • Designer Prints paper in Rose Red
  • Black & White Gingham ribbon
  • Whisper White cardstock
  • Black cardstock
  • Rose Red Cardstock (Base)
  • Snail Adhesive

Friday, February 1, 2008

It's Sale-A-Bration Time!


It's here! February 1 starts off a great Sale-A-Bration time at Stampin' Up! For every $50 you order between today and March 17 you will earn an exclusive set from the brochure posted above!

Contact me to place your order and receive your FREE stamps!

One of a Kind

The One of a Kind stamp set featured on page 109 of the Spring-Summer catalog is temporarily unavailable. SU! is looking into quality issues with the way the stamp lines up with its coordinating punch - Boho Blossom.

This set was on my list too - but I'd rather wait for the corrected version than have a set that isn't as perfect as it should be!

Wow! What an awesome deal!


Do you have at least 5 stamp sets on your wishlist? Are you interested in getting great Stampin' Up! products at a discount?
Now is the perfect time to sign up as an Independent Stampin' Up! demonstrator!
Join between February 1 and March 15 and get the starter kit and so much more for only $159!
During Sale-A-Bration, anyone who joins as a demonstrator can choose any stamp set--a value of up to $47.95--from the Spring-Summer 2008 Collection! Plus, new demonstrator recruits get 20 percent off the Demonstrator Starter Kit--over $350 of Stampin' Up! products and business supplies for only $159!
Don't have the time to devote to being a demonstrator? No problem! You are under no obligation to stay active. This kit is a fabulous purchase for anyone interested in adding to their stamping collection!
Did I mention that as a new demonstrator, you will receive 30% off your first order over $150? And 20% off all future purchases!
Still not sure? Contact me today for more information!

Monday, January 28, 2008

Spring-Summer DSP

If you ever want to know what solid cardstock colors coordinate with the fabulous Designer Series Prints in the new Spring-Summer 08 catalog... here you go!

Azure: Brilliant Blue, Very Vanilla
Bali Breeze: Old Olive, Taken with Teal, Rose Red, Pumpkin Pie
Berry Bliss: Purely Pomegranate, Pretty in Pink, Close to Cocoa
Cutie Pie: Bashful Blue, Basic Black, Certainly Celery, Rose Red, So Saffron
East Coast Prep: Real Red, Wild Wasabi, Tempting Turquoise, More Mustard
Flowers for You: Certainly Celery, Lovely Lilac, Regal Rose, Tempting Turquoise
Fall Flowers: Old Olive, Really Rust, Soft Sky, Sahara Sand
Ginger Blossom: Ruby Red, River Rock, Cameo Coral, Groovy Guava
Jersey Shore: Wild Wasabi, Pumpkin Pie, Brilliant Blue, Bashful Blue
Le Jardin: River Rock, So Saffron, Very Vanilla, Always Artichoke, Bashful Blue
Notebook: Soft Sky, Kraft, Vanilla
Olive Press: Old Olive, Very Vanilla
Porcelain Prints: Blue Bayou, River Rock, Wild Wasabi
Spring Fling: Certainly Celery, Sage Shadow, Pretty in Pink, So Saffron
Spring Silhouettes: Wild Wasabi, Certainly Celery, Soft Sky, Very Vanilla
Western Sky: Ruby Red, River Rock, Blue Bayou, Soft Sky

Friday, January 25, 2008

Life is Good with Rub-ons!


I found this mirror in the Target Dollar Spot several months ago. It got put away in my "stuff to alter later" drawer, like so many other items I've stumbled upon!

I added a few new Stampin' Up! rub-on embellisments to the corners. And added a little white ribbon to hang the mirror. Done!

Your turn. Pull something out of your "later" box and give these Rub-ons a try!

Monday, January 21, 2008

Shore do love you Mr. Crab

If you are looking for a fun yet versatile stamp set - you should check out the Crab & Company set. This adorable crab (are crabs adorable?) comes in a set of 14! There is a crab (duh), a clam, a starfish, a shell, and a crawfish (maybe a crayfish). To accent the sea creatures, you get a party hat, a slice of birthday cake, a santa hat, and a wrapped present. There are also 5 cute sayings that coordinate with the set. Snappy birthday, sandy claws, a pinch to grow an inch, jingle shells, and shore do love you. Cute huh?!


To create this card I used Kraft cardstock for the base. I used the Sandy Shells Stampin' Wheel with Basic Black ink. And the Itty Bitty Backgrounds in Basic Black on the top of the card. I used a strip of Not Quite Navy that was crimped using the Crimper tool. I stamped the crab in Basic Black ink onto Real Red cardstock and cut him out. I added a couple of wiggle eyes to perk him up a little. He's holding a sign created using More Mustard, and Whisper White cardstock with the shore do love you stamped in Basic Black ink.
To create the heart shapes on his sign, I used my Scallop punch! I simply lined up the corner of my Whisper White cardstock with the edge of 2 scallops until I saw a heart shape. Pretty easy!

Wednesday, January 16, 2008

Be My Valentine Workshop

I stink you're sweet!
Will you join me for some fun on Saturday, February 2nd?

We will be making 30 Valentine cards for $15. That's only .50 per card! Your child will have the cutest cards in class!

I have 10 spots available for this class - so please be sure to RSVP with your payment soon to gaurantee your spot!

We will be using Pun Fun, Loads of Love, and Ahoy Matey! for this workshop. Purchase any of these sets during the workshop and receive FREE shipping!

Isn't he cute?

I created an embellishment for my youngest son's scrapbook using a Stampin' Up! Build a Brad. You can punch any image out using the 1/2" punch for your own Build a Brad! Go ahead, try it!

Hostess Club Projects

Our first hostess club was held on Monday! We had a great time hanging out, chatting about all the new stuff in the Spring-Summer catalog, and making 3 projects! Here they are:


I got this idea from Nichole Heady's website http://nicholeheady.typepad.com/capture_the_moment/2007/12/a-sneak-peek-of.html. I used the 1" punch and the Bali Breeze paper to create the cover for the Reese's Peanut Butter Cups. We wrapped the tin in a strip of Bali Breeze paper, and adhered it using some Mono Multi Adhesive. The lid features some Certainly Celery ribbon, and a new rub-on from Stampin' Up! The tins can be found at specialtybottle.com

This card was made using a River Rock base. The designer paper is called Ginger Blossom. We used the Embrace Life stamp set for the flowers and phrase on Whisper White cardstock. We finished it off with some River Rock double stiched ribbon!
We finished off the evening with this progressive scrapbook page. We used the Wanted set from Stampin' Up! and a Close to Cocoa base. The horses were stamped using Versamark. The 8-1/2"x 11" base is a sheet of River Rock, with stars stamped using Versamark. The 6"x6" portion is Pumpkin Pie with a strip of Close to Cocoa, a square piece of River Rock under the Whisper White. We stamped the Wanted on the Pumpkin Pie using Basic Brown Classic ink and finished off the 6"x6" with a piece of River Rock double stiched ribbon. For our embellishments, we used the scallop punch in River Rock, Close to Cocoa, and Pumpkin Pie. The centers were created using Build a Brad!

It's your time!

With all of the great new sets that are in the Spring-Summer catalog, and with all of the great promotions that are coming soon... now is a great time to schedule your own workshop!

Sale-A-Bration starts on February 1. For every $50 purchase you make (before tax and shipping) you can select any set in the Sale-A-Bration brochure for FREE!

Don't have $50 to spend with on yourself? No problem! You don't have to spend any money when you host a workshop! When your workshop reaches $150 in sales, you begin to earn free stamps and merchandise! In addition to our regular hostess benefits, hostesses will receive a free Sale-A-Bration stamp set for workshops that reach $300 or more during the Sale-A-Bration promotion.

The Occasions Mini catalog will be released on March 1. Let me just tell you now - that you are going to need a towel to wipe the drool off of your chin! There are some spectacular new items in the catalog! Why not earn some of them with your hostess benefits?

Don't have time or space for a workshop? I'm here to help! You can hold the workshop in my home, or host a workshop in a bag. I do all the prep work for you! The easiest is the workshop in a bag. I prepare a gift bag that has catalogs, special promotions, order forms, and sample projects in it. You take it with you wherever you go and collect orders and payments. It's amazing to see how quickly your hostess benefits add up all because you passed a catalog on to someone you know. It's also a great way to meet new people, who have the same interests as you!

Ladies in my hostess clubs: if you schedule a workshop in a bag during your hostess month - the sales are added to your hostess workshop! Reap the benefits of being in a hostess club and having an outside workshop!

Contact me for more information, or to schedule your workshop!
ilove2scrap@cox.net
623-261-9613

Tuesday, January 15, 2008

Big news from Stampin' Up!

The current Spring/Summer 08 catalog will be in effect until August 10th! The new Fall/Winter 08 catalog will start on August 11th!

This is great news for all of us! Why? Remember a little over a month ago, when we were crazed during the holidays, and time seemed to slip away? Perhaps you missed out on some stamp sets or accessories that have retired. Well, with these new dates, we avoid the big holiday rush and can make better purchase decisions.

Stampin' Up! used to unveil the catalog at convention in July. They didn't do that this past year due to switching to 2 catalogs per year. They want to give that perk to demos back! So demos who attend convention in July will get the first look at the catalog. Then it will be released to our customers!

So, now instead of using this catalog until June 30th - you will get to use it until August 10th!

Book your workshops now!

Saturday, January 12, 2008

Make your own dry erase board!


Cute, huh?

I got the idea from splitcoaststampers.com. There are some very talented ladies on that site! Please note that the stamps used on these tiles are NOT from Stampin' Up!

I found some 4"x4" glossy tiles (like you would find in the kitchen or bathroom) at Home Depot. Guess what... they were only .12 each! The perfect price for trying out a new craft that you aren't sure will work.

I used my embossing buddy on the tile first, so that I wouldn't get a bunch of stray flakes of embossing powder. I got a few flakes - but not as many as I would have, had I not used the embossing buddy.

I then used craft ink (or a dye based ink) and stamped my image right onto the tile. The tile is a bit slippery - so be sure you hold the stamp steady. If you do smear it - like I did several times - just use a wipe or damp cloth to wipe away the ink and start over! Sweet!

After I stamped the image, I covered the image using black detail embossing powder. Knock off the excess and gently wipe away any stray flakes. Then heat emboss the tile. Carefull - the tile gets extremely HOT! Learned that one the hard way too! Let the tile cool before you move it.

That's it! Seriously, that's it! Now you have a cool dry erase board that you made all on your own! Just use a dry erase marker and your notes easily wipe off with a paper towel.

You can get these tiles in many different sizes. I chose this size because it is just a bit larger than a pad of Post-it notes - perfect size for a desk.

I tried a couple of times to color the image in using Sharpie markers but had no luck getting the color to stay on the tile after it was wiped. I will try a few more times to find the right sealer for it - but for now, I think these black and white tiles work well. If you are hard pressed about having color, you can always stamp your image in colored ink, and use a clear embossing powder. It will probably still only be 1 color, but could work very well for Valentine's, St. Patrick's, or Christmas boards.

Get an email when I update my blog!

Do you see that feedBlitz badge to the right?

If you would like to receive an email when I update my blog, all you need to do is enter your email address. Then select the email option. You will then receive a message that asks you to check your inbox for your subscription activation email from feedBlitz@mail.feedblitz.com, the email subscription service for "Scissors-cut-paper" - you must click the link in the email to start your subscription. If you use spam filters, please add the feedBlitz email service address to your list of permitted senders.

Sweet!

Friday, January 11, 2008

Be My Valentine

As promised... here is an example of what we will be making at the Valentine workshop on Saturday, February 2nd from 3:00 - 5:00 at my home!

I used the pirate from Ahoy, Matey! on this sample. All cardstock will be precut for you! You choose the images you want from Loads of Love, Pun Fun, and Ahoy, Matey! to create 30 Valentine cards to share. The cost of the class is $15, and includes materials and candy for the cards.

Can't make it on the 2nd? You can still participate! Buy a workshop to go kit. For $20, I will stamp the images of your choice for you, provide you with the precut cardstock, ribbon, and candy - and you can color and assemble on your time!

There is space for 10 participants - so be sure to reserve your spot today!

Interested? Contact me by January 27th to place your order or RSVP for the February 2nd class.

Thursday, January 10, 2008

Valentine Workshop

Woo Hoo! I just ordered supplies for my Valentine Workshop!

I ordered the new set Pun Fun! Want to see it? It's on page 66 of the new Spring-Summer catalog. Click here to go to the catalog.

This set is going to be so much fun! Not just for Valentine's Day, but for so many more occasions. I also love that it can be used for boys and girls!

We will also be using Loads of Love and Ahoy, Matey! in the workshop. We will be making a card that holds a sucker. I will post a sample later this week.

The cost for the workshop will be $15 for 30 cards. That's .50 a card! Your child will have the cutest cards in the class!

If you would like to join me on Saturday, February 2nd at 3:00 for this special Valentine Workshop, please call or email me!

Wednesday, January 9, 2008

Twinkle Twinkle Little Star

Tonight I was trying to come up with a fun scrapbook page for my Hostess club on Monday night. Not sure if this is it or not, but it was simple and turned out cute! I love Stampin' Up! wheels, so when I saw the Nursery Letters Jumbo wheel in our Spring Preview, I had to get it. I didn't order the Nursery Necessities set from our preview brochure, and keep seeing so many samples that make me wish I had ordered it! So, I got to improvise a little here. The Nursery Necessities set has a really cute star that works with the large Star punch. The star has letters, just a bit smaller than these on it, but has a little bit of a border around the edges. I don't mind that I didn't have a border, and got basically the same look - using stamps I already had!

I started with a 8-1/2" x 11" piece of Summer Sun cardstock. I used Tempting Turquoise Classic ink, and my Nursery Letters Jumbo Wheel from the new Spring-Summer catalog. I then used my large Star punch, also from the new Spring-Summer catalog, to create 6 stars. I then cut the remaining cardstock into two 4-1/4" x 6-1/4" rectangles. I then added two pieces of Whisper White cardstock that are 3-3/4"x 5-3/4". Before using my Snail to adhere the rectanges to my 12x12 piece of Tempting Turquoise, I added a piece of White Taffeta ribbon along the side.
I love sparkles! I chose one of my stars to shine bright! I used some Crystal Effects with a dash of Dazzling Diamonds, and set it a little bit with my heat gun. I then added 3 dimensionals to the back to really make it pop!

Light Bulb Moment!

Ever have one of those moments where you hear or read something, let it pass, and then all of the sudden... the light bulb over your head turns on?!?! Oh my goodness, why I didn't think of this earlier, I don't know. But what I do know... is that the next time I'm at Target, I'll be cruising to the Christmas Clearance!

I read a post on SCS where a genius bought Christmas cards on clearance at Target FOR THE ENVELOPES!!! They were 90% off. She got some 360 envelopes for like $5. That's about a penny per envelope!

Bonus... you can donate the cards to Church, Goodwill, a local hospital...

Hello??? Are you still there?? Hello?

Save some for me!!

Sunday, January 6, 2008

So long Outlaws!

I have a sign in my front room that says, "Outlaws welcome, in-laws call first" - is that bad? Hee hee! I loved the Outlaw Designer Series Paper from the Fall-Winter Catalog. But since it has expired, I had to use it up. So I started with this fun box and candle project.

To make the box, I cut a piece of 12x12 Designer Series paper in half, creating 2 6x 12 pieces of paper. I wanted my box to be a little smaller, so I cut each piece down to 4 1/2 x 10. I then scored each of the large pieces at 1/2", and 2 1/4" on each side of the paper - you may adjust your score lines to the size of box you want to create. After folding the ends over, I added eyelets at 1 CM from the edge of each lip.
I then crossed the paper over eachother to create a t shape. and used my Snail to adhere the top piece to the bottom piece.
To form the box, I used 4 pieces of twine in the eyelets next to eachother.
The candle was made using the Wanted set. I stamped the horses, and stars in Creamy Caramel and Chocolate Chip Classic ink onto white tissue paper. I then wrapped the tissue paper around a candle that I purchased at Dollar Tree, and used my heat gun to set the tissue paper. I added another piece of twine around the candle to finish the look!

It's a Sale-A-Bration!

February 1 - March 17 is this year's Sale-A-Bration (SAB)! For every $50 you spend in the Spring-Summer Catalog, you get to select a FREE SAB set! The SAB flyer is attached below. These sets are not available for purchase! They won't be offered in any upcoming catalogs! You can only earn them! There is no limit to the number of FREE sets that you can earn. But there is a limited time to get them.

When you host a workshop of at least $300, you’ll receive a free Sale-A-Bration set in addition
to the generous hostess benefits! You’ll receive a second Sale-A-Bration set when your net workshop sales reach $600. Get a third set for workshop sales of $900 or more!*

Ready to earn some FREE product from the new Spring-Summer catalog and get a SAB set or two for FREE? Host a workshop! You can host a workshop in a bag, a workshop in my home, or join a hostess group to take advantage of this great offer from Stampin' Up!

Contact me today for more information!!

Wednesday, January 2, 2008

Click on the picture to view the new catalog online. Contact me to find out how to get your paper copy!

Tuesday, January 1, 2008

FREE Ribbon!

Now that we have passed the threshold into the new year, it is time to start thinking about Valentine's Day!


Stampin' Up! is offering a Sweet Treats bundle for the month of January. The bundle includes the incredibly cute Happy Heart Day Stamp Set, Real Red 5/8" Grosgrain Ribbon, 50 Medium Cellophane Bags, and a FREE spool of 5/8" Regal Rose Grosgrain Ribbon. You can purchase this bundle using item #111903 for $33.40. Check out the link for more info, or contact me to place your order.


http://www.stampinup.com/us/documents/US_Valentines_Bundle_0108.pdf


You can be creative with this set... think Teacher gifts, Classroom treats, Valentine's Day cards,
Thank you gifts/treats, and so much more!