Wednesday, April 30, 2008

Voila! Happy Birthday!


Paper: Stampin' Up! Basic Gray, Whisper White, Basic Black
Ink: Classic Black, Real Red marker, Rose Red marker, Pretty in Pink marker, Creamy Caramel Marker, Yo-Yo Yellow marker
Stamps: Voila!
Accessories: Double circle punch, 1" circle punch, Word Window punch, Dimensionals, 1/4" Grosgrain Black Gingham ribbon
Other: 2 Pennies
I used my Double circle punch towards the bottom of the card and pulled my ribbon through it. This left a void on the front of the card where I added the faux button. The button was created using the double circle punch on black cardstock. Then I centered the 1" circle punch over the double circles. Added a separate piece of Grosgrain ribbon, and then attached it where the void was on the front.
After stamping the Chef image, I used my Word Window punch to create the slide on the card. I went a little more than 1/2 way over his tray so that the cover would go over the cake! Then I sandwiched a dimensional between 2 pennies and placed it in the slide. I added the cake to the tray once I knew where the pennies would stop. I used another dimensional to attach the cover to the pennies. Voila! The cover slides across the card to reveal a yummy birthday cake!

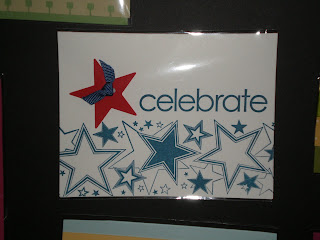
Time to Celebrate!

Paper: Stampin' Up! Night of Navy, Real Red, Whisper White
Stamps: Celebrate Everything
Ink: VersaMark, Night of Navy
Accessories: Large Star Punch, Small Star Punch, Clear Embossing Powder, Heat Gun
I tried the emboss resist technique! I stamped celebrate in VersaMark ink, then embossed with clear embossing powder. Then I sponged the Night of Navy Classic ink over the strip of Whisper White cardstock. Wipe over the embossed image to reveal the white image.

Friday, April 25, 2008

Emboss with Uni-Ball Gel Pen!

I was making a few cards today, and wanted to leave the flower on the card white. Well, not just flat white like the paper... but white, like a color.

So I grabbed my new Uni-Ball white gel pen and started coloring. I noticed that it was rather wet. So rather than let it dry... I sprinkled some clear embossing powder on top and gave it a quick blast of heat!

Ta-da!! Hopefully you can see it in the picture - but it did actually work! Fun times!!

The stamp is from Fun & Fast Notes. It is stamped in Basic Black on Whisper White cardstock. Purely Pomegranite, and Basic Gray cardstock was also used.

Thursday, April 24, 2008

Orange you sweet?

Found some orange slices as I was checking out of Hobby Lobby today! Thought they would be cute in a bag with a topper that had been stamped with Pumpkin Pie colored oranges from the Tart and Tangy set. Thank you is from Family Phrases. And I added a little Pumpkin Pie bow.

Wednesday, April 23, 2008

Hey Lady!

This 8-1/2" x 11" scrapbook page was so easy to create! I used a Real Red base and randomly stamped the large image from Baroque Motifs around the edges in Basic Black. I added a mat of Black cardstock, under a piece of Whisper White cardstock. To create the blue sky, I sponged Brocade Blue all over.

The flower was created using the large oval punch. The center was punched from a scrap of Yo-Yo Yellow. The petals are punched from Whisper White. I inked the edges of the petals and center using Summer Sun classic ink. And added a quick Old Olive stem. I used my Black journal marker to add spots to the center of the flower.

The ladybug was created using my 1-3/8" circle punch in Real Red and Black cardstock. I used my Crop-a-dile to punch random holes in the Real Red cardstock, and then cut the circle in half. The head of the ladybug is a 1" circle from Black cardstock. I drew the antanae onto the Whisper White cardstock using my Black journal marker.

Where does she come up with these things? Well, I first saw a card done by Faith on Splitcoaststampers, and then saw another card done by Desiree

Both of their creations are beautiful! Maybe mine will look like theirs someday! :o)

Tuesday, April 22, 2008

You're a blast!

I wheeled Sweet Stars on a Whisper White base using Basic Black ink. I then colored in the double lined stars using a Tempting Turquoise marker. I colored in a few circles using a Pumpkin Pie marker. The rocket is from the Pun Fun set. I used Real Red, Tempting Turquoise, and Pumpkin Pie markers to color it in after stamping it in Basic Black in on Whisper White cardstock. The rocket is layered on a piece of Tempting Turquoise and Pumpkin Pie cardstock. A super fast and simple card!

Sunday, April 20, 2008

Here you go...

Here's what I've been busy working on! Some have stamping, some are SU! designer series paper, and some have neither! I'll be back after church to share the details. :o)


Thursday, April 17, 2008

I'll be back!

I'll be back tomorrow with some new stuff to share! I have been busy preparing for an All About Mom vendor fair this weekend. I've got lots of cards to share, gift ideas, and altered items to share with you! So check back Friday night!!

Monday, April 7, 2008

It's been 10 years!


Hubby and I celebrated our 10 year anniversary this weekend. We took a trip to New York and then Paris! Ya, right. We actually went to Las Vegas and stayed at New York, New York hotel and then visited the Paris hotel. We went to the top of the Eiffel Tower. What incredible views!


Oh, and you'll never guess who we ran into...

They were such gentlemen at the wax museum!

Carousel Notes

Have you seen the cute Carousel Notes in the Ocassions Mini? They are fabulous! I thought I would share a few ideas on how to use them. You have until May 30th to order your own Carousel Notes!
This one comes straight from the Stampin' Up! website.

The Essence of Love page
Stamps
Essence of Love(set of 4; 111494; $17.95)
Paper
Whisper White card stock: 2" x 5"; 1" x 1"
Wild Wasabi card stock: 2" x 5"; 1" x 3"; 1" x 1"
Chocolate Chip textured card stock: 1" x 1"
Carousel Notes
Ink
Chocolate Chip Classic Stampin' Pad
Chocolate Chip Stampin' Write marker
Accessories & Tools
Love Birds Rub-Ons
Stampin' Dimensionals
Coluzzle Cutting System
Pick a Petal Classy Brass
Crafters' Tool Kit
1/4" Circle punch
Stylus
Sewing machine and thread
Instructions
- Cut photo in approximately 4-1/8" circle using Coluzzle Cutting System. Adhere photo to center of Soft Sky Carousel Note page.
- Pierce around edge of page using Classy Brass template and paper-piercing tool from Crafters' Tool Kit.
- Dry emboss circle in each scallop of page using Classy Brass template and stylus.
- Write name and date using Chocolate Chip Stampin' Write marker.
- Sew around photo starting and stopping at beginning and end of journaling. Do not sew over name and date.
- Round right edges of Whisper White and Wild Wasabi card stock (both 2" x 5") to match photo using Coluzzle Cutting System.
- Tear edge of Whisper White card stock.
- Layer on photo, so torn Whisper White edge shows behind Wild Wasabi card stock.
- Cut flowers from bottom of "Lasting friendship" Rub-On, and apply to page using wood stick included in Rub-Ons assortment.
- Cut out butterfly Rub-On, and apply to Wild Wasabi card stock (1" x 1").
- Cut out butterfly, and adhere to page using Stampin' Dimensionals.
- Stamp quote in Chocolate Chip ink on Whisper White card stock (1" x 3"), and cut out quote only (not attribution).
- Adhere to page using Stampin' Dimensionals.
- Cut flower from Whisper White card stock (1" x 1"). You may find it useful to trace a flower from your Pick a Petal Classy Brass template onto your card stock, and cut it out.
- Punch circle from Chocolate Chip textured card stock using 1/4" Circle punch. Adhere to center of flower.
- Adhere flower to page using Stampin' Dimensionals.
Check out what these AMAZING crafters are making with their Carousel Notes...
Carousel Notes Purse...
Carousel Notes Tote...
Have you made something with your Carousel Notes, or have you seen another great project? Leave a comment to share!