Showing posts with label scrapbook. Show all posts

Tuesday, January 25, 2011

Love Birds!


I am so in love with this scrapbook! Doris Denman created one and posted it on our demonstrator website. I seriously couldn't get the Love Birds Simply Scrappin' kit ordered fast enough! Come to find out... I didn't have all of the same Big Shot dies that she did to create the whole scrapbook... but that did not stop me! I just went with it! Some of the pages are CASE (copy and steal everything), while others are my own. I am so in love with this (did I already mention that?)!  Anyway... there are 14 pages and 2 of those are fold out pages - so really, there are 16 pages in this album. And, it only used up 1/2 of a Simply Scrappin' kit!! Woo hoo!! The best part?! It is in a clear mount stamp case!! Small enough to throw in your purse, big enough to show off your photos! Did I mention that it took less than 2 hours to cut and asseble everything? I love it!!

I'll be hosting a class so you can complete your own scrapbook! Watch for more details soon!! Almost everything will be cut and ready to go - so a whole scrapbook in less than 2 hours?! Be still my heart!

Thursday, June 11, 2009

Bear with me

I love this bear from the Under the Stars set! It's "grrreat!"
This is a clear envelope brag book that we made at Hostess Club. We used Sahara Sand card stock, Sweet Slumber DSP, and Very Vanilla card stock. For a tutorial on how to create your own brag book... go here.

Wednesday, May 13, 2009

Sunshine Garden Challenge

Each Hostess Club, I give my members a challenge piece. They received a piece of the Sunshine Garden Simply Scrappin' Kit, and a sheet of the die cuts to go with it. This page is what I came up with.
I cut the strip of flowers from the 12x12 page and added it to a piece of Baja Breeze card stock. I cut the strip of stripes from the same page and adhered them to pieces of Kiwi Kiss card stock. I really like these colors, and am going to miss them when they retire this summer!

Tuesday, May 12, 2009

Daisy Baby

A quick progressive page made during our Hostess Club using In-Colors, and the Daisy #2 Big Shot Die, and the polka dot texture plate! We added a bit of Dazzling Diamonds to the centers of the flowers using 2-way glue. And yes, that is me at 3 months old! :)
Colors: Pink Pirouette, Riding Hood Red, Basic Black, Whisper White.

Monday, May 4, 2009

2 year old rock star

This is my oldest son taken when he was 2. He's now almost 11! I so can't believe how time flies. I also can't believe that I am just now getting around to scrapbooking this photo! Yikes!!
I used the Rockabilly Designer Series Paper for this layout. Be sure to check out the current sale going on to see how you can get FREE paper!
I also used Sticky Cuts letters and glitter for the "rock" on the page. The stars were cut from Basic Black card stock using the large star punch. I did my journaling (which I am really bad about doing on my layouts) on a piece of Whisper White card stock that I punched using the round tab punch.

Tuesday, April 7, 2009

Hoppy Memories

A few pages that I made using my Simply Scrappin' Hoppy Memories Kit.
Now... to just add the pictures, and get them in an album!


I LOVE LOVE LOVE Stampin' Up!'s Simply Scrappin' Kits. They make it so easy to put pages together. Now, finding the time to sit and do them is another story. I had this grand goal at the start of the year to work on my scrapbook albums a little each month. So far... these 4 pages are all that I've accomplished! I NEVER thought I would say this... but I am so looking forward to see the digital scrapbooking suite that Stampin' Up! is coming out with!
I have come to realize that I am a goal setter... not so much a goal achiever. I just can't believe how quickly the time gets away. Our "to do" list for the house has been reduced so I can say we are making progress, it just doesn't feel like it. My goals this weekend are to go to on the hunt for baby bedding so that I can pick a paint color for the nursery, and get to Michaels for some photo storage boxes. Mind you I have agent convention the rest of the week, a baseball game Friday night, 2 more games Saturday morning, Easter on Sunday that I still need to prepare materials for my 1st grade class, and a ton of laundry to get through. I'll let you know how far I got next week! What are your goals for this weekend?


Monday, November 17, 2008

I Wish

We did a 6x6 scrapbook page at our Hostess Club using the I Wish Simply Scrappin' Kit, and the coordinating Snow Swirled stamp set. I love the colors in this kit- some of my favorites! Brown, Olive, and Red! Yum!
We stamped the Snow Swirled tree image in Old Olive Craft Ink. Then sprinkled Dazzling Diamonds mixed with Clear Embossing Powder over the image and heat set it. You can use Iridescent Ice Embossing Powder too - but I like getting more bang for my buck by mixing my own when I need it! That way I have Dazzling Diamonds, and Clear Embossing Powder for all my other projects!
Here's what the tree looks like when the light catches it. It's awesome!

Thursday, September 18, 2008

Knock, knock...

Who's there?
Cows!
Cows who?
No, silly! Cows go moo!


Remeber the punch owl I made? Here he is on a 6x6 scrapbook page.

He is on a Really Rust base with Chocolate Chip strips and Very Vanilla for the photo mat. I used a few dimensionals to prop him up on the page.

Monday, August 25, 2008

Give a Hoot...

How fun is this guy? Or is it a girl? He will be featured on one of my upcoming Hostess club projects!
Here are all of the parts I punched out...

To create the layers for his chest and wings, I used a circle punch after I punched the scallop to get the size of layer that I wanted. His feet are a little weird looking - but aren't most feet? I used the scallop circle punch, and then cut a space between to make 2 feet. His beak was just snipped off of a corner piece of Pumpkin Pie card stock.

The best part... the whole thing was created using scraps! Give a hoot... don't pollute! {:

Wednesday, August 13, 2008

Together

Here is an 8-1/2" x 11" scrapbook page that I made for one of my Hostess club meetings. It uses Old Olive card stock, now retired Home Again DSP, retired River Rock card stock for the tag, On Board chipboard for the "t", and now retired Hodgepodge Hardware that was added to the tag. The together stamp is from the Define Your Life stamp set.

No, Stampin' Up! hasn't created a longer tag punch. The card stock was cut into a strip and pulled through the punch to elongate the tag. You can create any length tag to go with your projects this way!

Thursday, May 29, 2008

Outlaw

I decided to scrap a little this past week. I also decided I needed to start using up some DSP that I had. I love this Outlaw paper - but it retired... last year! Doh!! So I guess there's no harm in using it. Right?
The boys love going to northern Arizona when the leaves start to change. I started with a 12" strip of Sage Shadow. I used my Lovely as a Tree set with VersaMark ink for the row of trees. Then I used my Best Friends alpha in River Rock classic ink to stamp Prescott. The leaves on the journal box and to the bottom are also from the Lovely as a Tree set, and I used the marker and spray bottle technique on them.
Here, I added small leaves from the Lovely as a Tree set on the 12x12 Creamy Caramel using my River Rock classic ink. I continued the row of VersaMark trees on my Sage Shadow cardstock strip. I added a strip of Chocolate Chip and Very Vanilla (hungry for an ice cream sundae yet) for the title. The leaves on the title page are stamped on the same strip as the title. I just cut the top and bottom on the strip off to reveal the top and bottom of the leaves. I love how that turned out.


Friday, May 9, 2008

Simply Scrappin'

Do you know what this is?


It's what I have left of my Home Again Simply Scrappin' Kit after creating a 20 page 6x6 album!


I'm having a class on May 31st if you are interested in scrapbooking with me and learning how you can create a 20 page album in less than 3 hours!


Wednesday, April 30, 2008

Time to Celebrate!

Paper: Stampin' Up! Night of Navy, Real Red, Whisper White
Stamps: Celebrate Everything
Ink: VersaMark, Night of Navy
Accessories: Large Star Punch, Small Star Punch, Clear Embossing Powder, Heat Gun
I tried the emboss resist technique! I stamped celebrate in VersaMark ink, then embossed with clear embossing powder. Then I sponged the Night of Navy Classic ink over the strip of Whisper White cardstock. Wipe over the embossed image to reveal the white image.

Sunday, March 2, 2008

So much to share with you...

I started preparing my display boards for our P.M.S. party! Here are just a few of the sample items I will have to show. If you have any questions... leave me a comment!

Joseph's Coat technique with a top layer of Crystal Effects and Dazzling Diamonds.

Remember when you would color a piece of paper with different colors and then color over the top with a black crayon and scratch the black with a design? Well, now they have the paper that's already made that way for kids, but here is a stamper's version. It's done using a brayer, glossy card stock, Versamark, Classic Inks, embossing powder, and a heat gun.

You're A Blast - from Pun Fun is such a cute stamp set! To create the corners on the Gable Green card stock, and Real Red card stock, I used my Slit Punch. The ribbon was made using Whisper White Grosgrain, and my Gable Green marker!

Thank Ewe, thank ewe very much! I used my markers to omit the heart that this cute sheep was holding in it's left hand. Or is that a hoof? The colors are Old Olive and So Saffron.
Going Baroque. I love this set! This is a 6x6 layout. I used my Scallop punch, my 1-3/8" circle punch and my 1" circle punch to create the medallion.
Friendship Blooms. I almost didn't get this Sale-A-Bration set - but I am glad I did! This card was CASED from Nancy Riley. I used So Saffron, Basic Black, and Whisper White here.
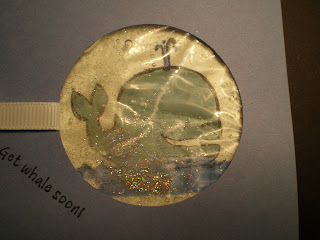
Get Whale Soon! This whale is part of the Pun Fun set. He is so much fun! I used my Round Tab punch to create a circe large enough for the whale to peek through. What's he swimming in? Why that would be clear hair gel! I did add a little glitter for some sparkle.

Here's a closer view of the whale.


My boys have their last basketball game next Saturday. To thank my youngest sons coach, I made this card using All in the Family and it's accessory set. Cute huh?!

Till next time...

Wednesday, January 16, 2008

Hostess Club Projects

Our first hostess club was held on Monday! We had a great time hanging out, chatting about all the new stuff in the Spring-Summer catalog, and making 3 projects! Here they are:


I got this idea from Nichole Heady's website http://nicholeheady.typepad.com/capture_the_moment/2007/12/a-sneak-peek-of.html. I used the 1" punch and the Bali Breeze paper to create the cover for the Reese's Peanut Butter Cups. We wrapped the tin in a strip of Bali Breeze paper, and adhered it using some Mono Multi Adhesive. The lid features some Certainly Celery ribbon, and a new rub-on from Stampin' Up! The tins can be found at specialtybottle.com

This card was made using a River Rock base. The designer paper is called Ginger Blossom. We used the Embrace Life stamp set for the flowers and phrase on Whisper White cardstock. We finished it off with some River Rock double stiched ribbon!
We finished off the evening with this progressive scrapbook page. We used the Wanted set from Stampin' Up! and a Close to Cocoa base. The horses were stamped using Versamark. The 8-1/2"x 11" base is a sheet of River Rock, with stars stamped using Versamark. The 6"x6" portion is Pumpkin Pie with a strip of Close to Cocoa, a square piece of River Rock under the Whisper White. We stamped the Wanted on the Pumpkin Pie using Basic Brown Classic ink and finished off the 6"x6" with a piece of River Rock double stiched ribbon. For our embellishments, we used the scallop punch in River Rock, Close to Cocoa, and Pumpkin Pie. The centers were created using Build a Brad!

Wednesday, January 9, 2008

Twinkle Twinkle Little Star

Tonight I was trying to come up with a fun scrapbook page for my Hostess club on Monday night. Not sure if this is it or not, but it was simple and turned out cute! I love Stampin' Up! wheels, so when I saw the Nursery Letters Jumbo wheel in our Spring Preview, I had to get it. I didn't order the Nursery Necessities set from our preview brochure, and keep seeing so many samples that make me wish I had ordered it! So, I got to improvise a little here. The Nursery Necessities set has a really cute star that works with the large Star punch. The star has letters, just a bit smaller than these on it, but has a little bit of a border around the edges. I don't mind that I didn't have a border, and got basically the same look - using stamps I already had!

I started with a 8-1/2" x 11" piece of Summer Sun cardstock. I used Tempting Turquoise Classic ink, and my Nursery Letters Jumbo Wheel from the new Spring-Summer catalog. I then used my large Star punch, also from the new Spring-Summer catalog, to create 6 stars. I then cut the remaining cardstock into two 4-1/4" x 6-1/4" rectangles. I then added two pieces of Whisper White cardstock that are 3-3/4"x 5-3/4". Before using my Snail to adhere the rectanges to my 12x12 piece of Tempting Turquoise, I added a piece of White Taffeta ribbon along the side.
I love sparkles! I chose one of my stars to shine bright! I used some Crystal Effects with a dash of Dazzling Diamonds, and set it a little bit with my heat gun. I then added 3 dimensionals to the back to really make it pop!

Monday, December 31, 2007

Our Family

Soft Sky and Creamy Caramel? I never would have put them together, until they happened to be next to eachother on my desk. I added a bit of River Rock double stitched ribbon to my 6x6 Whisper White cardstock. Then used a strip of Whisper White to stamp people and pets using the All in the Family set. I colored them in using various colors of my Stampin' Write markers. I stamped Our Family using the Best Friends alphabet set, on Whisper White. I used the Neighborhood wheel on the side of the Creamy Caramel 12x12 cardstock.


This may be one of our Hostess club projects - but probably not our first project!