Showing posts with label Crafts. Show all posts

Thursday, December 16, 2010

This little light of mine...


I love this candle!
I used my Stampin' Up! black vinyl to cut the nativity on my Cricut. Used Transfer Tape to apply it to the glass, and a bow and presto!! Done! Sweet!!

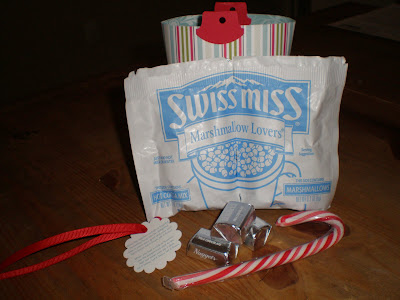
Snowman Soup!

To keep up with tradition... I made my son's music teacher gifts at the last minute - literally!
These snowman soup cups are super easy and quick to do, and who doesn't love that?!

I found these cups at T@rget (10 for $2.49). I added a package of cocoa with the marshmallows. You can add the marshmallows in a baggie if you'd like - but I don't care for touching other people's food. A candy cake for stirring. And a few kisses. The Whisper White tag has the snowman soup poem printed on it. Easy! Sweet! Fun! Go get some!

When the weather outside is frightful,
Snowman Soup can be delightful.
May it warm your spirit and your soul.
Let it snow, let it snow, let it snow!
When you feel a chill or are saying "brrrr,"
Use the candy cane stick to stir.
Add hot water and sip it slow.
Let it snow, let it snow, let it snow!

Monday, November 15, 2010

Craft fair part 2!

I had a great time at the MOPS craft fair on Saturday. I think I made too much stuff because even though I sold a TON of items - I came home with a lot too! Lucky for you... I'm having a Craft Fair Part 2 this Saturday at my house! Here are a few of the items that I had at the original fair, and will possibly have at the second one! There's too much stuff to post, so be sure to stop by if you are local!


Thursday, October 28, 2010

Hey there cupcake!

I made baby washcloth cupcakes! Fat free, ha ha! Each cupcake uses 2 washcloths. I found the cupcake boxes at the craft store. I stamped the baby stroller using the Fun & Fast Notes set, colored it in with my Pretty in Pink marker, covered the stroller with Crystal Effects and added some Dazzling Diamonds! They are so cute sitting on my table! My hubby thought they were real cupcakes! :)

Thursday, August 26, 2010

You want S'more?!

I have had several requests for "S'more" information about this fun project! So... because I love what I do, and I share what I love... here you go!
-The box is from Stampin' Up! Sizzix Box #2 die. I ran it through my Big Shot using a piece of Not Quite Navy card stock.
-Randomly stamp the star image from the Under the Stars set using Basic Black Classic ink.
-The Large Oval punch was used to create the open window on the box.
-A small piece of Sticky Strip is used to hold the whole box together!
-The bear from the Under the Stars set was stamped twice. Once on Crumb Cake card stock, and once on Chocolate Chip textured card stock. -The tummy from the Chocolate Chip was cut out and adhered to the Crumb Cake bear using a Dimensional.
-The s'more was stamped on Crumb Cake card stock. It was colored using More Mustard and Chocolate Chip markers. The marshmallow was colored in using the White Signo Gel Pen!
-Cut out the s'more and adhere it to the bear paw using a Dimensional.
-Then adhere the bear and s'more to the box using Dimensionals.
-The s'more mix is Golden Graham cereal, chocolate chips, and mini marshmallows. It is packaged in a small cello bag, and tied with Whisper White Grosgrain ribbon.
So there you have it! I shared what I love, will you share with me? I would love to see your S'more creations!
If you want to see even more great ideas, check out Sherrill Graff from Late Night Stamper (LNS). She has some amazing ideas and a love for Stampin' Up! Demonstrators like no other!

Thursday, June 3, 2010

Sweet Music

I found this awesome project on Julia Bettencourt's blog. They were perfect for my son's Wednesday night music teachers! Too bad I found it on the day of their last class!! But I have to tell you... this was so simple and quick to do! The part that took the longest was going to the store for the candy!
Fold a brown lunch bag in half. Then fold one flap down about a 1/4 of the way to create a pocket. I used my Crop-a-dile to punch holes through all layers of the bag. I used Chocolate Chip ribbon to hold it all together. I found the sheet music online, and printed it on Whisper White Cardstock. I sponged the cardstock with Creamy Caramel ink to give it a distressed look. I used my large flower punch to create the flower accessory and used a brad to secure it to the ribbon. Added my Symphony bar, and printed Psalm 100 on Whisper White Cardstock, sponged with Creamy Caramel ink, and called it good! Julia's is more elaborate than mine, and I really could have used more color like hers but not bad for a quick teacher appreciation gift!
Who knew brown paper bags could turn out so cute?!

Wednesday, February 4, 2009

Where is that recipe?

Here is a recipe box that will be featured at
an upcoming class at my church.
We will be using the Voila, and From the Kitchen of
stamp sets to create the project.
I punched the tabs using my circle punches and adhered them to the tops of my divider cards. I colored the Chef with my SU! markers, cut him out, and used dimensionals to pop him up on the recipe box.
If you are local, and would like to attend this FREE class - contact me by February 18th so I can prepare the stamped supplies for you!

Tuesday, November 25, 2008

Travel Mugs

Not much crafting going on here for the past few days. So, I'm digging up some photos and stories from my craft fairs that I haven't shared yet! I tell you, you meet some interesting people at these craft fairs! If you have the opportunity to participate in one - you should! You won't get rich, or make a ton of money, but you will have some stories to tell!

These are travel mugs that I stamped the inserts for. The two that aren't colored in can be colored by the kids and given as a gift. I think I will make a few more of these for my last craft fair of the year! The 3 below have found a home (Thanks Trina!).

I had a beautiful one using the dragon fly from the Bugs & Kisses set. They were stamped in different colors, and I added Dazzling Diamonds to the wings. It was so pretty. Well, it was the first one that sold! Great! Well, not so much. The lady that bought it wanted it because she's been looking all over for these type of cups because her son had made her one of these a long time ago and the cup got ruined. She just wanted the cup! I thought it was funny, but at the same time wanted to give her one of the other ones that I had.


Friday, November 14, 2008

My Christmas list book!

I made 4 of these cute Christmas list books for the craft fairs. I came home with all 4 too! LOL!
I found these books at the Dollar Tree. They have plastic covers so they won't tear apart in your purse. They have tabs too, so you could make a section for gifts, food, dates of parties, or maybe a tab for each family member.
I used the Snow Swirled images. I first stamped in Silver Encore ink and then embossed the images with clear embossing powder. I layered them on Silver Cardstock and added a little Basic Gray Taffeta bow to finish them off.

Countdown to Christmas

Don't panic! There's more like 40 days until Christmas, but 25 is the biggest number that this Decor Elements piece comes with. So fun! I used an 11"x 14" frame for the SMALL Decor Element! The paper backround is Ski Slope, and is under the glass. So when we get more fabulous Christmas paper next year - I can change it out! Yippee! I put the numbers on squares of cardstock and then taped a metal washer to the back. I used a dot of Crystal Effects to adhere a magnet to the glass! Done!

Snowman Soup in a bag!

Here are some photos of the Snowman Soup that I made for my Monday Hostess group. I used the Ski Slope Designer Series Paper. So pretty! You can do these for any season! They are fairly simple to mass produce too!
The side:
The inside:
The goodies:
The tag from Nicole Heady's blog:


I've seen these box/bags on many sites, but was afraid to try them. Oh my goodness! They are so easy!! Here are some super instructions for how to construct your box. I didn't add the extra strip around the bottom of mine.
The tag is from Nicole Heady. You can download your tags own here.

Thursday, November 13, 2008

Craft fair sighting...


Here is a picture of me at the Thursday craft fair. We were worried about the chocolate melting, but as you can see from my jacket - it turned out to be a rather cool day!


A quick list of what we had:
Stamped Canvas bags
Kids Color Me cards
Husband's 6-Pack
Stamped Candles
Hershey's Nuggets Tins
Reeses Peanut Butter Cups in Tall Tins
Power of M&M's poem with box of M&M's
Whisk you a Merry Christmas/Happy Thanksgiving
Stamped Coasters
Stamped Glass Ornaments
Birthday Bowls
Post-it Note Keychains
Water Bottle Tags
Various Scrapbooks/Bragbooks
Christmas list notebooks (I'll post these later on)
Christmas Fudge
Coffee Mugs
Stamped Travel Mugs
Stamped Glass Jars
Dog bone gifts
Reindeer Food
Thanksgiving Nuts
and of course Retired Stampin' Up! sets and ink.


I came home with a lot of stuff on Thursday, did a little better on Saturday. Sold some more stuff at Hostess group on Monday. And now Suz has some stuff at her school to sell for Secret Santa items. I have one more fair on December 7th. I don't think I am going to make anything new for that one. I don't know where I'm going to put all the stuff I currently have!
I think that next year, I need to prepare some reminder signs. One's to jog their memory about who the might need a simple gift for - Need a quick gift? Teacher? Co-worker? Don't forget your Secret Santa. Stocking Stuffers!


My Dad loaned me a tent for Thursday because we were outside. Well, he gave me his business tent! So here we were with all of our Stampin' Up! goods under a giant blue tent that says "Golf Channel Tour". We had many male visitors, but as soon as they realized it was a trap - they took off!

The highlight of Saturday is when 2 ladies visited our table. They were admiring our goodies, but then realized what some of the goods were in. Longaberger baskets! Not just any Longaberger baskets though. These were like gold! Oh, my dear friend Suz listened to these 2 ladies go on an on about how much they were worth because they were two toned, had the stamp on the bottom, and had the metal labels! My friend Staci and I giggled. It felt like we were being filmed on the Antique Roadshow! 1986 authentic Longaberger baskets! Oh my word, why is this out in the open? It was rather amusing. So Suz, did you check out how much they are worth? :)

Monday, November 3, 2008

Nuts!

I was going through some old cards (does anyone else keep their old greeting cards?) and came across one with this Thanksgiving saying...
Thanksgiving always reminds me of my family...
A turkey, A ham, and a whole bunch of nuts!
I loved it!
So... with a few craft fairs coming up, I thought I'd see if anyone else liked it. I added the saying to the top of a bag of trail mix!
Because I don't have any Thanksgiving stamps, I created a fall pumpkin using my small oval punch and my word window punch! I love Stampin' Up! punches! They are so easy to use and you can create just about anything with them!

Thursday, October 30, 2008

Leave a message

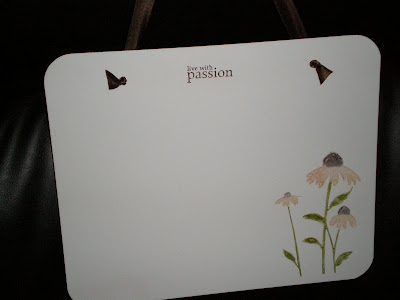
So my crafty friend Suz asked me if you could stamp on a wipe-off board. Uh... I know you can do glossy tiles, but I dunno about wipe-off boards. So... I had to try!
Here are my results!
So yes, you can stamp on wipe-off boards. I used the Inspired by Nature set and used craft ink. I then heat set it with my heat gun.
However, you cannot write over the images with your wipe-off marker and expect the ink to come off of the image! Grr... There's got to be a way to get the marker off but I've tried everything... Crystal Effects, Clear Gloss, Thick Enamel, I even tried embossing it! No luck. So I guess if I make these for the fair or to give away, I will have to put a little disclaimer saying, "to preserve the beautiful image, please don't write over the image" I don't like to do that - but what other options are there? Hmm... maybe not to make them?! Ha ha

Tuesday, October 7, 2008

Working on some tiles

Here are a few tumbled tiles that I'm working on...
This set uses the Inspired by Nature set. I used Chocolate Chip, More Mustard, and Old Olive for the flowers.
This one uses the Nature Silhouettes set with Basic Grey for the tree, deer, and edges. I used More Mustard and Brocade Blue for the background. Sorry for the dark picture too! I couldn't get it to come out right. The boys liked the tile though. I thought it was a little dark but wanted to give it a shadowy look. Do you think it's too dark?


Candle experiment

I have had several questions regarding stamped candles and whether or not they are safe to burn. To be honest, I've never lit one. So I decided to find out for you...

I placed the candle on a glass plate to protect my table, and then lit the candle.

After a few minutes, I could see that the candle burns inward. Meaning that the wax pooled in the center rather than running down the sides.

Then I got impatient waiting for it to burn! So I took the flame to the spot that we wanted to test - the tissue paper.

No fire! It did discolor the tissue a little bit - but I would have no worries about burning these stamped candles.


Hope this helps you and your decision about burning your pretty stamped candles! Especially the candles that burn inward.

Thursday, September 18, 2008

More bottle tags


These are quite fun to make. Except for getting the ring onto the plastic part - but I'm going to experiment with that a little.
For the monkey: I used Black Stazon to stamp the Sock Monkey image onto Shrink Plastic. Then I used my Stampin' Write Markers to color him in.
For the flowers: I colored the large flower on my Inspired by Nature stamp with my Stampin' Write Markers. I went back and touched up the coloring after I stamped it onto the Shrink Plastic to make it a bit brighter.
Then I put them in my little toaster oven. Not the one that pops up though - that would be bad! :)
After they had cooled, I added the ring and the elastic band. Done!

Saturday, September 6, 2008

I {heart} fall!


Yes, I know it is still 110 here in Arizona. It doesn't even get below 95 until Halloween, but I love decorating and getting ready for fall! Somehow it makes it seem cooler out? :)
Have you ever made a pumpkin with punches? Here's a quick tutorial. I used 3 small ovals and 1 word window punch. I punched my tag out at the same time, using the small tag punch.

Attach the word window to one of the ovals, making sure the oval and the word window are even at the bottom. Then attach the remaining 2 ovals to the back of the word window strip, slightly offset. Then attach to the tag.
I used the "for you" stamp from the Fresh Cuts stamp set.
Here's a closer look at the completed tag. Are you wondering what I've attached my tag to?

This is my very own haystack! I got the idea from the new Fall-Winter IBC. The one in the book is actually a witch broom. Since I don't have any Halloween stamps, I decided to go with a haystack!
To do this, I used 2 brown paper lunch sacks and cut them into strips down to the base of the bag. I added a wrapped popcorn ball to the center of the bag and then gathered the strips at the top, tied a piece of ribbon and attached the tag.


Too pretty to light.

I've been working on projects for some craft fairs that are coming up quickly. Here are a few of the candles that I will have available...

The candles on the left are made with Stampin' Up! Rub-ons. So quick and easy! The candle in the middle and to the right are stamped with Stampin' Up! images.


I used a retired coffee stamp set on the candle in the middle. The scent is toffee (I think). But see how the color drips down the candle? Well, that was a mistake - but I love it! The whole candle was the color of the top. But I have discovered that when you melt colored candles the color runs - quickly! So unless you are going for the drip effect, I would stick with white or cream colored candles.


So obviously the Rub-ons are simple enough to do. The hardest part about the Rub-ons is deciding where to lay the images.

To make the images on the candles... you aren't actually stamping on the candle. You stamp on a strip of tissue paper! Then you can color in you image with markers. You then use a heat tool to melt the tissue paper right onto the candle. So fun!

Wednesday, August 27, 2008

Photo cube

I found this project on paperjewels.blogspot.com. I happened to have 4 cd cases left over from a different project and went to work! I didn't create the holder for the bottom like others did- so my cube is open. I still need to add my photos, but I kind of like it plain too. This would be a cute gift for a teacher! Check out her site for more great ideas and let us know if you create one!

You will need 4 empty cd cases, scrapbook paper, thin embellishments, a paper cutter, scoring blade, and some adhesive.