Sunday, September 30, 2007

Tins

Specialty Bottle Tins!


Yummy! Here are a few of the finished nugget tins that I worked on Friday night. And yes, there is still some chocolate left over to make more tins later on!

I used the hinged tins and a couple of the square tins. The hinged tins have either dark chocolate, toffee with almonds, milk chocolate, or almond Hershey's nuggets in them. The square tins have either Hershey's Kisses or York Peppermint Patties in them. Now the challenge will be to get them all in the tins before the rest disappear!

I have a few tea tins to try out sometime this week too!

By the way... I CASED the square tins from Laura at Whirlpool of Imagination

http://lauraoshea.typepad.com/whirlpool_of_imagination/2007/09/fun-friday-ch-2.html?cid=84687796#comment-84687796

Friday, September 28, 2007

I'm official!

After a phone call from SU! about my credit card being declined *GASP* and realizing that I had the wrong expiration date on the application... I soon received the email with my password. No demo number though. So I wait. Checked my email this morning to find that they had sent my kit out this morning. It's due to arrive on Monday! I couldn't take the axiety pain any longer... I had to call and find out what my number was so I could take a peek at the demo site! Yippee!! I'm in!! Now, where to start... that's a different story!

Thursday, September 27, 2007

Update!

It's been delivered!

At 9:07 am, Mr. (or Mrs.) Brown delivered my application to Stampin' Up!

Yippee!!

Tracking

Remember when you were little and on Christmas Eve there would be "Special Reports" on the TV tracking Santa? Wondering how he traveled so far, so fast? I think UPS studied these "Special Reports" and modeled their shipping business after it.

Check out my Stampin' Up application's journey:

Scottsdale, AZ at 12:18 pm
Arrived in Tempe, AZ at 4:37, departing at 7:00 pm
Arrived in Phoenix, AZ at 7:29, departing at 10:02 pm
Arriving in Ontario, CA at 11:00 pm, departing at 2:07 am
Arriving in Salt Lake City, UT at 4:33 am
Out for delivery at 6:30 am

Isn't it amazing how much gets done while you're sleeping?

From what I've read on another website is that most people get their demo numbers emailed to them as soon as it arrives at Stampin' Up offices. If that's the case - I should get my number by tomorrow morning!

My order from Specialty Bottle is out for delivery too. That should arrive tonight when I get home.

Can't wait to start crafting after work on Friday!

Saturday, September 22, 2007

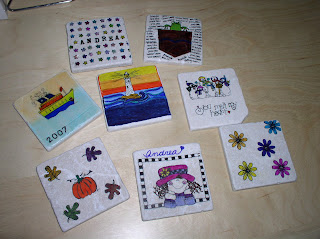
Tile Coasters

I tried my hand at stamping on tile! I have to tell you that I was very impressed with how they turned out. I bought a package of 24 Sharpie markers when they were on sale at Target. I cruised down the street to Home Depot and purchased some Bottochino unglazed tiles for $6 or so. Pulled out my Stazon ink and some random stamp images and gave it a whirl.

I wiped the tiles clean with a damp rag. Stamped the image using Stazon ink. Let the image set and dry for a minute or two. Then colored with my Sharpies.

I used a stipple brush and my ink pad to create the water and sky on the tile with the boat.

No sealing, no baking on these babies! So far they look great!

There's a tutorial on Splitcoaststampers.com if you'd like more info.


More name frames

As promised... here are a few more name frames that I made for Christmas gifts last year!

Don't have a Cricut Die-Cutting maching? No problem! You can use chipboard letters, computer generated letters, or stamps! Give it a try!


Tuesday, September 18, 2007

Name Frames

Last Christmas I made name plates for gifts. I CASED the idea from CraftyKim on the Cricut messageboards. You can see her original creations here: http://www.cricut.com/messageboard/tm.aspx?m=161012&mpage=1

They were so much fun to make with my Cricut. I will post a few that I made when I get home.

Here is one that I made for my friend Staci's son, Connor. The photo is a little dark, but the paper is a soft green and blue and has some little baby faces on it planted like carrots. I added some button brads between the C and O, and the O and R.

I found the frames at Wal-Mart. They are the ones that hold 2 4x6 photos side by side in a mat. I believe they were 2 for $6!

There are lots of little cuts for this project that you will need. I tried to get all the papers together and then cut them, set them aside, and then cut my letters.

Recipe: Background: 4 7/8 x 12 "

color for letters to sit on: 1 1/4 x 2 1/2

Next biggest color: 4 1/4 x 11

Background for letters: 1 3/4 x 2 3/4

AND Background for letters in different color: 1 1/2 x 2 1/2

Designer print paper: 4 x 10 3/4

Cricut Stamped Cartridge, size 2, shorty feature

I used a purple glue stick to assemble the pieces and then adhered them to my background. Some had some added hardware to dress them up at little.

Friday, September 14, 2007

Tea Light Luminaries


Here are a few of the vellum lamp shades I made. I CASED the idea from a few that I saw on Splitcoaststampers.com! You can find the template and detailed instructions here at Splitcoast http://www.splitcoaststampers.com/gallery/photo/287801?si=vellum%20wine They are super easy and beautiful when the "candles" are lit. I used the battery operated tea lights - so as to avoid any fire danger! I will post a few more this weekend.